WordPress Theme Development Tutorial from Scratch in Hindi (Part 2)
हमने WordPress Theme Development Tutorial from Scratch in Hindi (Part 1) में हमने ये जाना की WordPress Theme Development के लिए Pre-Requirements क्या है जैसे की आपको HTML, CSS, Bootstrap का basic ज्ञान होना चाइये. इसके अलावा हमने अपने computer पर WordPress Theme Development के लिए Local Development Environment को setup करना सिखा.
मुझे उम्मीद है आपने मेरी first post को अच्छे से पढ़ और समझ लिया होगा और उसमे जो भी practical task आपको दिए थे वो भी आपने सफलतापूर्वक complete कर लिए होंगे और अगर आपने इस series के part 1 को नही पढ़ा है तो मेरा आपको suggestion है की पहले आप part 1 को को read करें उसके बाद WordPress Theme Development Tutorial from Scratch in Hindi (Part 2) को continue करें.
Table of Contents
WordPress Theme Development Tutorial in Hindi
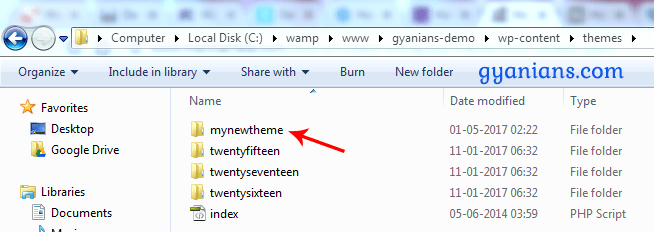
सबसे पहले आप अपने computer में WampServer को start करिये उसके बाद WordPress के themes folder ( C:\wamp\www\wordpress_folder\wp-content\themes\ ) में जाइए. इस location पर पर आपको 3 अलग-अलग theme folders और एक index file नजर आएगी. अब आप अपनी new theme के लिए एक folder create करिये और उसे कोई भी name दे दीजिये.
Note – मैंने WordPress install करते वक़्त अपने WordPress folder को gyanians-demo name दिया है और अपने new theme folder को mynewtheme name दिया है.
Create Some Files – जैसा की मैं आपको part 1 में बता चूका हूँ की WordPress theme में multiple template files होती है. ये files create करने के लिए आप notepad या notepad++ text editor का use कर सकते है और ये सभी files आप mynewtheme के अंदर ही create करेंगे. आप नीचे दी गयी सभी files create कर लीजिये same name और same extension के साथ और अभी इन सभी files को blank छोड़ दीजिएगा. हम इनको एक-एक करके edit (code) करेंगे.
- style.css
- index.php
- functions.php
- header.php
- footer.php
- sidebar.php
- content.php
- comments.php
- page.php
- single.php
- category.php
- 404.php
style.css – WordPress theme के लिए हम सबसे पहले style.css file edit करेंगे. इस file के अंदर आप सबसे पहले theme metadata को comment में लिखते है. आप नीचे code को copy करके उसमे changes कर सकते है. Metadata के नीचें हम अपनी theme को design करने के लिए css code करते है.
/*
Theme Name: Gyanians
Author: Neeraj Parmar
Description: My New WordPress Responsive Template
Version: 1.0
*/
WordPress Theme Development in Hindi
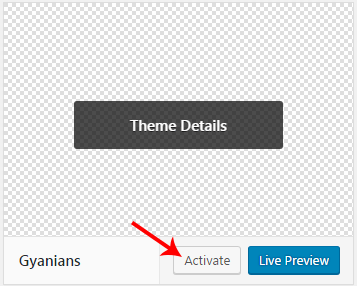
अपनी new theme को use करने के लिए आपको इसे सबसे पहले WordPress dashboard में जाकर activate करना होगा. इसलिए सबसे पहले WordPress dashboard में login हो जाइए और फिर उसके बाद Appearance >> Themes में जाइए. यहाँ आपको WordPress की 3 default themes में से एक activate मिलेगी और आपको अपनी theme भी नजर आयेगी जिसका thumbnail आपको transparent नजर आयेगा.
इसके अलावा आप अपनी theme को name से भी पहचान सकते है क्योंकि आपकी theme का वहीं name नजर आएगा जो आपने style.css file में दिया था. जब आप अपना mouse अपनी theme पर ले जायेंगे तो आपके activate का button नजर आएगा उस पर click करके आप अपनी theme को use कर सकते है और browser पर देख सकते है. अभी आपको theme देखने पर blank नजर आएगी क्योंकि हमने index.php file में अभी कुछ भी code नही किया है.
WordPress Theme Kaise Banaye
हम सबसे पहले index.php file को edit करेंगे और अपनी theme का basic structure तैयार करेंगे. index.php में code करने के लिए उसे notepad++ editor में open कर लीजिये. नीचें आप को जो code नजर आ रहा है वो static html code है. जिसे अब हम WordPress के In-Built PHP functions से Dynamic WordPress में change करेंगे और फिर उसके बाद हम index.php file को 3 files (header.php, footer.php, sidebar.php) में divide करेंगे.
<!DOCTYPE html>
<html lang="en">
<head>
	<meta charset="utf-8">
	<meta http-equiv="X-UA-Compatible" content="IE=edge">
	<meta name="viewport" content="width=device-width, initial-scale=1">
	<meta name="description" content="">
	<meta name="author" content="">
	<title> Demo Title </title>
	<link rel="stylesheet" href="https://maxcdn.bootstrapcdn.com/bootstrap/3.3.7/css/bootstrap.min.css">
    <link href="https://maxcdn.bootstrapcdn.com/font-awesome/4.7.0/css/font-awesome.min.css" rel="stylesheet">
	<link href="style.css" rel="stylesheet">
</head>
<body>
<div class="container" id="holder">

</div>
	<script src="https://ajax.googleapis.com/ajax/libs/jquery/3.1.1/jquery.min.js"></script>
	<script src="https://maxcdn.bootstrapcdn.com/bootstrap/3.3.7/js/bootstrap.min.js"></script>
</body>
</html>
PHP functions in WordPress CMS
जैसा की मैं आपको अपनी “ WordPress Kya Hai ” post में बता चूका हूँ WordPress CMS को PHP programming language से ही बनाया गया है. WordPress CMS को customize और theme development करने के लिए बहुत सारे WordPress specific PHP function होते है. हम भी इन in-built functions का use करके static HTML page को dynamic WordPress theme में बदलेंगे.
मैं यहाँ clear कर दूँ की यहाँ हम अपना खुद का कोई php code नहीं करेंगे. हम सिर्फ WordPress in-built PHP functions को सही time पर सही जगह use करेंगे. इसलिए आपको PHP आती हो या नही इससे कोई फर्क नही पड़ेगा. मैं आपको हर function का use explain करूँगा. जिससे उस function को आप कभी भी कहीं भी use कर पाए. ये बात याद रखें की हर php code को हम opening <?php और closing ?> के बीच में लिखते है.
Change Static HTML Static Code in Dynamic WordPress Theme Step By Step
Change Language attribute – हम किस language पर काम करना चाहते है ये हम अपने WordPress dashboard की setting में select करते है. अब हम जो language dashboard में select करेंगे वो dynamically header.php file में भी change हो जाए. उसके लिए आप language_attributes() function का use करते है.
<html lang="en">Let’s make them dynamic now with the code below:
<html <?php language_attributes(); ?>>Change Meta Tag – अब हम charset और description meta को static से dynamic में change करेंगे. इसके लिए हम bloginfo() function का use करेंगे. bloginfo() function आपके site, user profile और general settings को show करता है जो आपने अपने WordPress dashboard में set की होती है. bloginfo(‘description’) function आपकी site की tagline show करेगा जो आपने dashboard में Settings>>General में set की होगी.
<meta charset="utf-8">
<meta name="description" content="">
Let’s make them dynamic now with the code below:
<meta charset="<?php bloginfo('charset' ); ?>">
<meta name="description" content="<?php bloginfo('description') ?>">
Change Title – अभी हमने static title लगा रखा है और आप इसे भी php function की help से भी dynamic बना सकते है. लेकिन ज्यादातर WordPress blogger SEO के लिए Yoast SEO plugin का use करते है तो वो आपके title code को rewrite कर देती है. इसलिए आप चाहो तो title को static छोड़ सकते हो या नीचे code को copy paste कर सकते हो.
<title>
	<?php
		if(is_home()) { bloginfo('name'); echo ' - ';  bloginfo('description'); }
		else { wp_title(''); echo ' - '; bloginfo('name'); }
	?>
</title>
Add Stylesheet – जैसा की आपको पता है की theme के folder में ही एक style.css name से required file होती है जिसमे theme information और CSS code होता है theme को design करने के लिए. इस stylesheet को add करने के लिए bloginfo(‘stylesheet_url’) function use करते है.
<link href="style.css" rel="stylesheet">Let’s make them dynamic now with the code below:
<link rel="stylesheet" href="<?php bloginfo('stylesheet_url'); ?>">Add Header function – header.php में ये सबसे important function है. Closing </head> tag से just पहले wp_head() function को add किया जाता है. Third party plugins और widgets से interact करने के लिए ये function use किया जाता है और इसे add करते ही page के top में admin bar के लिए white space आ जाता है.
<?php wp_head(); ?>Add Footer function – जैसे header.php में wp_head() important function होता है ऐसे ही wp_footer() function भी footer.php में important होता है. इस function को </body> close tag से just पहले लगाते है. इसे लगाने के बाद जैसे ही आप अपनी page को reload करेंगे तो आपको admin bar नजर आने लगेगा.
<?php wp_footer(); ?>Look all Changed in Index File
<!DOCTYPE html>
<html <?php language_attributes(); ?>>
<head>
	<meta charset="<?php bloginfo('charset' ); ?>">
	<meta http-equiv="X-UA-Compatible" content="IE=edge">
	<meta name="viewport" content="width=device-width, initial-scale=1">
	<meta name="description" content="<?php bloginfo('description') ?>">
	<title>
		<?php
		if(is_home()) { bloginfo('name'); echo ' - ';  bloginfo('description'); }
		else { wp_title(''); echo ' - '; bloginfo('name'); }
		?>
	</title>
	<link rel="stylesheet" href="https://maxcdn.bootstrapcdn.com/bootstrap/3.3.7/css/bootstrap.min.css">
    <link href="https://maxcdn.bootstrapcdn.com/font-awesome/4.7.0/css/font-awesome.min.css" rel="stylesheet">
	<link rel="stylesheet" href="<?php bloginfo('stylesheet_url'); ?>">
	<?php wp_head(); ?>
</head>
<body>
<div class="container" id="holder">

</div>
	<script src="https://ajax.googleapis.com/ajax/libs/jquery/3.1.1/jquery.min.js"></script>
	<script src="https://maxcdn.bootstrapcdn.com/bootstrap/3.3.7/js/bootstrap.min.js"></script>
	<?php wp_footer(); ?>
</body>
</html>
Separate the Header and Footer Files
अभी तक हमने header और footer का code भी index file में कर दिया था. अब हम header code जो हमे अपनी सभी template files में top में चाइये उसे header.php file में और footer code जो हमे हर template files में bottom में चाइये उसे footer.php file में index.php file से cut-paste (move) कर देंगे.
सबसे पहले आप index.php file में जाकर 1 line (starting) से लेकर opening container class div तक cut करके header.php में paste कर देंगे और closing container class div से लेकर last line </html> तक cut करके footer.php में paste कर देंगे.
अब हम header.php file और footer.php file को index.php file में php function की help से add करेंगे. header.php add करने लिए आपको index file में सबसे ऊपर get_header() function का और footer.php add करने के लिए आपको index.php file में सबसे नीचे get_footer() function का use करना है.
<?php get_header(); ?><?php get_footer(); ?>Look all Changed in Header File
<!DOCTYPE html>
<html <?php language_attributes(); ?>>
<head>
	<meta charset="<?php bloginfo('charset' ); ?>">
	<meta http-equiv="X-UA-Compatible" content="IE=edge">
	<meta name="viewport" content="width=device-width, initial-scale=1">
	<meta name="description" content="<?php bloginfo('description') ?>">
	<title>
		<?php
		if(is_home()) { bloginfo('name'); echo ' - ';  bloginfo('description'); }
		else { wp_title(''); echo ' - '; bloginfo('name'); }
		?>
	</title>
	<link rel="stylesheet" href="https://maxcdn.bootstrapcdn.com/bootstrap/3.3.7/css/bootstrap.min.css">
    <link href="https://maxcdn.bootstrapcdn.com/font-awesome/4.7.0/css/font-awesome.min.css" rel="stylesheet">
	<link rel="stylesheet" href="<?php bloginfo('stylesheet_url'); ?>">
	<?php wp_head(); ?>
</head>
<body>
<div class="container" id="holder">
Look all Changed in Footer File
</div>
	<script src="https://ajax.googleapis.com/ajax/libs/jquery/3.1.1/jquery.min.js"></script>
	<script src="https://maxcdn.bootstrapcdn.com/bootstrap/3.3.7/js/bootstrap.min.js"></script>
	<?php wp_footer(); ?>
</body>
</html>
Look all Changed in Index File
<?php get_header(); ?>


<?php get_footer(); ?>
Conclusion: WordPress Theme Development
इस post में हमने सबसे पहले सिखा की कैसे आप अपनी new theme के लिए folder और files create करते है और फिर उसके बाद अपनी theme की meta information को style.css file में लिखते है फिर हमने अपनी theme को activate करना सीखा.
Next हमने अपनी theme के लिए header.php, footer.php और index.php file को WordPress के php function से code किया. इस series के next part WordPress Theme Development Tutorial from Scratch in Hindi (Part 3) में हम अपनी header file में logo और menubar (navbar) को add करना सीखेंगे.
आशा करते है की आपको ये WordPress Theme Development in Hindi और WordPress Theme Development Tutorial in Hindi post पसंद आई होगी. अगर आपको इस post से related कोई सवाल या सुझाव है तो नीचे comment करें और इस post को अपने दोस्तों के साथ जरुर share करें.
- Line App क्या है – बारे में पूरी जानकारी | Line App Download
- Public App क्या होता है- Video Download |Public App Download
- Josh App क्या है – बारे में जानकारी | Josh App Download Apk
- Khabri App क्या है – Khabri App से पैसे कैसे कमाए | Khabri App Download
- Google Meet से क्या होता है – पूरी जानकारी | Google Meet App

मैंने child theme (style.css और function.php) create कर active कर ली है अब मैं adsense के लिए apply करू तो उसमे header.php में के बाद जो code insert करने को कहा जायेगा तो
1.क्या मुझे child theme में header.php को same प्रोसेस से create करना होगा ?
2.क्या उसे एक्टिव करने के लिए कोई code भी इन्सर्ट करना होगा ?
3.क्या adsense के लिए सभी main footer page (about as …etc) को index करना जरुरी है ?
Aap Parent theme ke header me hi adsense code laga dijiyega;…
Sabhi pages me about etc page hona jaruri nhi hai..
Read About: WordPress Child Theme
thanks for reply
1.मेरे कहने का मतलब ये था की गूगल में about us ,contact as ,privacy pages को no index रखा तो चलेगा या index करना होगा
2. gtmetrix के Yslow के अनुसार entity tags (ETags) disable करने के लिए नीचे दिये गये code का उपयोग कर सकता हु ?
# TN – BEGIN Turn ETags Off
Header unset ETag
FileETag None
# TN – END Turn ETags Off
3.Use cookie-free domains के लिये कोई code हो तो जरुर शेयर करे /without plugin
1. First aap apne pages ko bhi index kara lijiye..
2. iska muje idea nhi.
3. I’ll search about that ~
Iss series se mujhe bahut kuch shikhne ko mila aur iss websites se bhi Thank you so much!…
Muje ye jankar bahut khushi hui .. thanks for visiting – keep sharing ~