WordPress Theme Development Tutorial in Hindi With Bootstrap (Part 4)

ये WordPress Theme Development in Hindi का WordPress Theme Development Tutorial in Hindi series का part 4 है जिसमे हम अपनी सबसे पहले अपनी header.file में सबसे ऊपर के topbar create करेंगे जिसपर अपनी email id और अपने social media follow icons को add करेंगे.
इसके बाद हम अपनी footer.php file में footer bar create करेंगे जिसपर हम dynamic copyright text with year और कुछ important pages जैसे की homepage, about us, privacy policy इत्यादि pages को उसपर add करेंगे.
header.php और footer.php file में theme sections create करने के बाद हम style.css file से उन section को responsive way में style (design) देंगे और फिर last में हम अपनी theme का first preview देखेंगे.
Suggestion: अगर आपने WordPress theme development with bootstrap in Hindi series के part 1, 2 और 3 को अच्छे read नही किया है और उनमे दिए गये सभी practical task को successfully complete नही किया है तो पहले आप उन्हें जरुर complete करें.
अगर आप बिना part 1,2 और 3 को read किये और उनमें दिए गये task को पूरा किये WordPress theme development के part 4 को read करोगे तो आपको कुछ समझ नही आएगा इसलिए नीचें गये link पर click करके इससे पहले के सभी parts को one by one read करें और फिर इस part को continue करें.
- Read: WordPress Theme Development with Bootstrap in Hindi (Part 1)
- Read: WordPress Theme Development with Bootstrap in Hindi (Part 2)
- Read: WordPress Theme Development with Bootstrap in Hindi (Part 3)
Table of Contents
WordPress Theme में Topbar (Email, Follow Icons) कैसे Add करें?
जैसे आप gyanians के topbar में देख सकते हैं की आपको left side email id (not show on mobile) और right side social media follow icons show हो रहें और इन दोनों के साथ मैं font awesome icons का use किया है अगर आप font awesome icons के बारे में अधिक जानकारी चाहते है तो दिए गये link पर click करके मेरी post को जरुर पढ़ें.
Topbar create करने के लिए आप theme की header.php file को open करिए और उस file में logobar div से just ऊपर और holder div के बाद 2 responsive column create करिए और first column में अपनी email id लिख दीजिये और second column में social media के pages के link को add कर दीजिये.
मैंने नीचें उन दोनों column का code snippets दिया है आप इस code को copy-paste कर लीजिये और अपनी requirement के हिसाब से change कर लीजिये. इस post के last में हम icons को style.css file css code करके design देंगे.
<div class="row topbar">
	<div class="col-sm-6 topbar-left">
		<i class="fa fa-envelope-o"> </i> [email protected]
	</div>
	<div class="col-sm-6 topbar-right">
		Follow On
		<a href="your-facebook-page-url" target="_blank" title="facebook"> <i class="fa fa-facebook"> </i> </a>
		<a href="your-twitter-page-url" target="_blank" title="twitter"> <i class="fa fa-twitter"> </i> </a>
		<a href="your-google-plus-page-url" target="_blank" title="google-plus"> <i class="fa fa-google-plus"> </i> </a>
	</div>
</div>WordPress theme development with bootstrap in Hindi series के part 2 में जिस तरह हमने top menu create किया था और फिर उसमे categories को add करके अपनी theme का navbar बनाया ठीख ऐसे ही हम footer area में pages को add करेंगे.
इसलिए सबसे पहले आप अपने WordPress dashboard में कुछ important pages (about us, privacy policy, terms of use etc) को create कर लीजिये और फिर Appearance >> Menus में जाकर एक new menu create कर लीजिये.
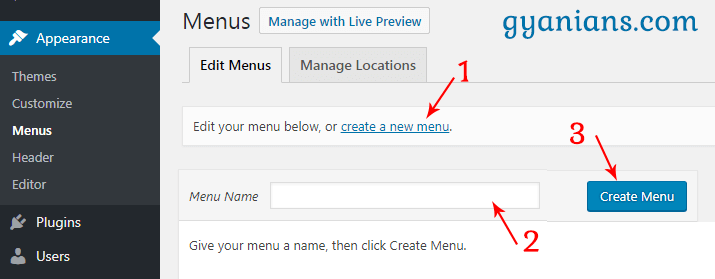
इसके बाद जो आपने pages create किये थे उन्हें new created menu में add करके secondary location पर add करके save menu button पर click कर दीजिये. अब हमे इस menu को अपने footer area में add करना है और इसके लिए हम wp_nav_menu() function का use करेंगे.
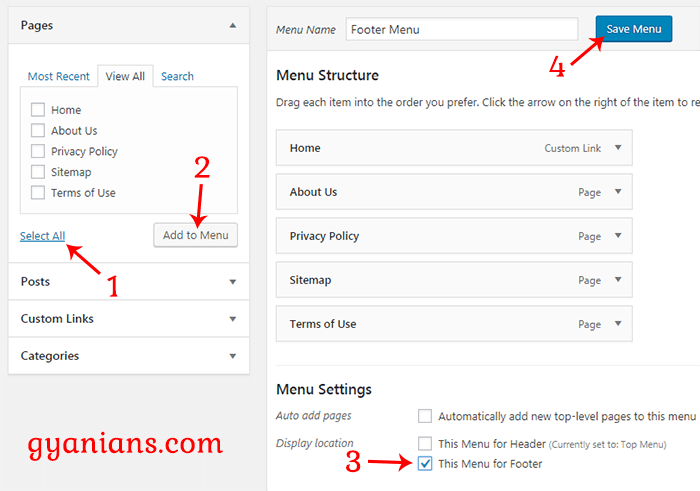
Footer area create करने के लिए आप theme की footer.php file को open करिए और उस file में सबसे ऊपर और 2 responsive column create करिए और फिर first column में wp_nav_menu() function की help से secondary menu को यहाँ add कर लीजिये.
इसके बाद next column में dynamic copyright text with year और blog name को add कर लीजिये. Copyright text में year हर साल अपने आप change हो जाये इसके लिए मैंने PHP date() function का उस किया है.
मैंने नीचें उन दोनों column का code snippets दिया है आप इस code को copy-paste कर लीजिये और अपनी requirement के हिसाब से change कर लीजिये. इस post के last में हम footer area को style.css file css code करके design देंगे.
<div class="row topbar myfooter">
	<div class="col-sm-8 topbar-left">
		<?php wp_nav_menu(array('theme_location' => 'secondary')); ?>
	</div>
	<div class="col-sm-4 topbar-right">
		<i class="fa fa-copyright" aria-hidden="true"></i> <?php echo Date('Y'); ?> By <?php bloginfo('name'); ?>
	</div>
</div>WordPress Theme Development in Hindi
जब भी आप कोई WordPress theme develope करते हो तो उसके backend part की तरह ही उसका frontend appearance (look) बहुत अच्छा होना जरुरी है और इसके लिए हमे CSS की अच्छी knowledge होने जरुरी है.
WordPress theme development की इस series में अभी तक हमने अपने theme का header और footer area code कर लिया है और अब आप इसे अपनी CSS की help से अपनी पसंद के अनुसार design कर सकते हो और अगर आपको gyanians की design पसंद है तो नीचें गये code को अपनी theme की style.css file में copy-paste कर दीजिये.
/*
Theme Name: Gyanians
Author: Gyanians
Description: My New WordPress Responsive Template
Version: 1.0
*/

* { margin:0; padding:0; font-family: 'Laila', serif; }
body	{ background-color:#eff3f6; }
#holder { background-color:#ffffff; }
.topbar	{ background-color:#333333; color: #FFFFFF; border-top:4px solid #000000; font-weight:bold; letter-spacing:1px; padding:5px;}
.topbar .topbar-right { text-align:right; }
.topbar  a { font-weight:bold; letter-spacing:1px; color: #FFFFFF; }
.topbar  a:hover	 { text-decoration:none; }
.topbar .topbar-right a .fa-facebook:hover { color:#3b5998; }
.topbar .topbar-right a .fa-twitter:hover	{ color:#55acee; }
.topbar .topbar-right a .fa-google-plus:hover	{ color:#dd4b39; }
.logobar { padding:15px; }
.navbar { border:none; background-color:#333333; border-radius:0; margin:0; border-top:4px solid #00bce4; }
.nav.navbar-nav li a { color:#ffffff; transition:0.3s; }
.nav.navbar-nav li a:hover, .act a { background:#00bce4; }
.dropdown-menu>li>a { color:#333 !important; }
.dropdown-menu>li>a:hover	{ color:#fff !important; }
.myfooter ul	{ list-style-type:none; }
.myfooter ul li { display:inline-block; margin-right:10px; }

@media (max-width: 768px) {
.topbar-left,.topbar .topbar-right{ text-align:center; }
.logobar img	{ margin:0 auto;}
}
Style.css file में code paste करने के बाद अपने browser में आप localhost URL (my URL locahost/gyanians-demo) से अपनी theme का अभी तक का design preview देख सकते हैं और मैंने अपने preview का screenshot नीचें दिया है.
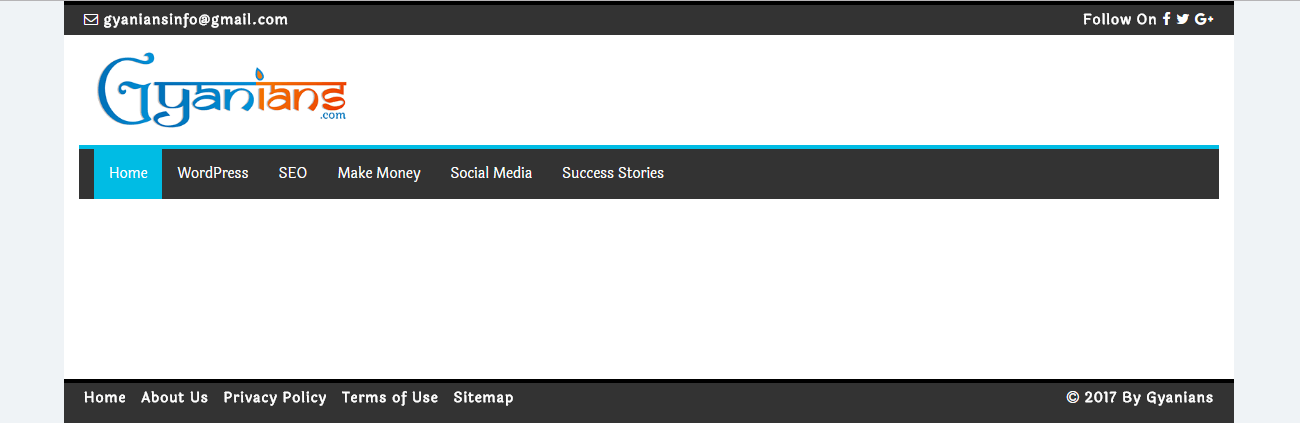
Look all Changed in Header File
WordPress Theme Development Tutorial in Hindi
<!DOCTYPE html>
<html <?php language_attributes(); ?>>
<head>
	<meta charset="<?php bloginfo('charset' ); ?>">
	<meta http-equiv="X-UA-Compatible" content="IE=edge">
	<meta name="viewport" content="width=device-width, initial-scale=1">
	<meta name="description" content="<?php bloginfo('description') ?>">
	<title>
		<?php
		if(is_home()) { bloginfo('name'); echo ' - ';  bloginfo('description'); }
		else { wp_title(''); echo ' - '; bloginfo('name'); }
		?>
	</title>
	<link rel="stylesheet" href="https://maxcdn.bootstrapcdn.com/bootstrap/3.3.7/css/bootstrap.min.css">
    <link href="https://maxcdn.bootstrapcdn.com/font-awesome/4.7.0/css/font-awesome.min.css" rel="stylesheet">
	<link rel="stylesheet" href="<?php bloginfo('stylesheet_url'); ?>">
	<?php wp_head(); ?>
</head>
<body>
<div class="container" id="holder">

<div class="row topbar">
	<div class="col-sm-6 topbar-left">
		<i class="fa fa-envelope-o"> </i> [email protected]
	</div>
	<div class="col-sm-6 topbar-right">
		Follow On
		<a href="your-facebook-page-url" target="_blank" title="facebook"> <i class="fa fa-facebook"> </i> </a>
		<a href="your-twitter-page-url" target="_blank" title="twitter"> <i class="fa fa-twitter"> </i> </a>
		<a href="your-google-plus-page-url" target="_blank" title="google-plus"> <i class="fa fa-google-plus"> </i> </a>
	</div>
</div>

<div class="row logobar">
	<div class="col-sm-3">
		<img src="<?php header_image(); ?>" height="<?php echo get_custom_header()->height; ?>" width="<?php echo get_custom_header()->width; ?>" class="img-responsive" alt="gyanians_logo" />
	</div>
	<div class="col-sm-9">
		<!-- 729x90 Size Ads banner area -->
	</div>
</div>

<nav class="navbar navbar-inverse">
	<div class="container-fluid">
		<div class="row nav-row">
			<header>
				<div class="navbar-header">
                    <button type="button" class="navbar-toggle collapsed" data-toggle="collapse" data-target="#navbar-collapse-1" aria-expanded="false">
                        <span class="icon-bar"></span>
                        <span class="icon-bar"></span>
                        <span class="icon-bar"></span>
                    </button>
				</div>
			</header>
			<div class="collapse navbar-collapse" id="navbar-collapse-1">
			<?php
                wp_nav_menu( array(
                    'theme_location'    => 'primary',
                    'depth'             => 2,
                    'container'         => '',
                    'menu_class'        => 'nav navbar-nav',
                    'walker' 			=> new wp_bootstrap_navwalker())
                );
            ?>
			</div>
		</div>
	</div>
</nav>
Look all Changed in Footer File
<div class="row topbar myfooter">
	<div class="col-sm-8 topbar-left">
		<?php wp_nav_menu(array('theme_location' => 'secondary')); ?>
	</div>
	<div class="col-sm-4 topbar-right">
		<i class="fa fa-copyright" aria-hidden="true"></i> <?php echo Date('Y'); ?> By <?php bloginfo('name'); ?>
	</div>
</div>


</div>
	<script src="https://ajax.googleapis.com/ajax/libs/jquery/3.1.1/jquery.min.js"></script>
	<script src="https://maxcdn.bootstrapcdn.com/bootstrap/3.3.7/js/bootstrap.min.js"></script>
	<?php wp_footer(); ?>
</body>
</html>
Conclusion
WordPress theme development की series में हमने अभी तक WordPress theme की template files के बारे में जाना और फिर localhost enviroment करके उसपर WordPress को install करना सीखा.
इसके बाद हमने अपनी theme का header area (topbar, logo, navbar) create किया और फिर footer area create किया और CSS की help से अपनी theme की design set की और अब इस series के next part में हम homepage पर latest posts और pagination को show करना सीखेंगे.
- Read: Blog Posts Me Programming Code Snippets Ko Kaise Add Kare?
- Read: WordPress Custom Shortcodes Kaise Banaye?
- Read: WordPress Blog Me Social Media Share Buttons Kaise Add Kare (Without Plugin)
आशा करते है की आपको ये WordPress Theme Development Tutorial in Hindi का (Part- 4) post पसंद आई होगी. अगर आपको इस post से related कोई सवाल या सुझाव है तो नीचे comment करें और इस post को अपने दोस्तों के साथ जरुर share करें.
- Google Meet से क्या होता है – पूरी जानकारी | Google Meet App
- Vokal App क्या है – Vokal App के बारे में पूरी जानकारी | Vokal App Download
- Khatabook App क्या है – पूरी जानकारी | Khatabook App Download
- Reddit App क्या है – Reddit App के बारे में पूरी जानकारी | Reddit App Download
- Yoyo App क्या है – Yoyo App कैसे चलाते है | Yoyo App Download

nice article sir….. theme development ki is post ke liye maine bahut wait kiya hai sir next iski next post aap kb tak publish karenege please tell me I am waithing for the other posts of theme develpment…..
My pleasure Brother .. ab late nhi karunga… theme development ki next post 20th tk aa jayegi, keep visiting ~
Thanks brother…..
WordPress theme devlopment kaise karte yah bata kar aap kafi logo ki help kar rahe hai. Good keep it up bro..
Thanks brother .. keep visiting, keep supporting ~
Nice information
Thanks ~
Thanks for share your valuable article
My pleausre brother, keep visiting ~
Boht hi badhiya jankari bhai thanks for sharing
My Pleasure, keep visiting ~
Nice Work Sir, but my template header image not fix in browser size, header image size saw very small size . please tell how to change size
Aap Bootstrap ke sath Bana Rhain hai na theme?
yes sir
Simple add bootstrap img-responsive class in image tag
sir how to live my wordpress site and how to add custom domain in wordpress in xampp server
XAMP localhost ke liye hai isliye isme custom domain add nhi hoga uske liye aapko ek hosting buy karni hogi jispar wordpress install karna hoga aur fir apni theme ko uspar upload karna hoga.
We Need WordPress Theme Development Part-5……..n. Please ASAP Publish new Post.
US Govt. stop my funding on that topic that’s by i can’t continue this series… :-p
Sir wordpress theme development part 5 please publish post.