WordPress Theme Development Tutorial in Hindi With Bootstrap (Part 3)
ये WordPress Theme Development in Hindi का WordPress Theme Development Tutorial in Hindi series का part 3 है. अगर आपने इस series के Part 1 और 2 को नही पढ़ा है तो पहले आप उन्हें अच्छे से पढ़कर समझ लीजिये और उनके सभी practical work को सफलतापूर्वक पूरा कर लीजिये.
अगर आपने WordPress Theme Development with Bootstrap in Hindi series के part 1 और part 2 को study कर भी लिया है तो भी मैं आपको suggest करूंगा की आप एक बार फिर Part 1 और 2 को revise कर लें जिससे की आपको इस part को अच्छे से समझने में ओर help मिलेगी.
इस part में पहले हम अपनी Theme में Text और Image Logo कैसे लगाते है ये सीखेंगे और फिर अपने theme में Responsive Dropdown Menu बनायेंगे. इसके अलावा functions.php file से WordPress Dashboard के कुछ features को activate और use करेंगे.
- Read: WordPress Theme Development Tutorial from Scratch in Hindi (Part 1)
- Read: WordPress Theme Development Tutorial from Scratch in Hindi (Part 2)
Table of Contents
WordPress Blog Header Me Text Logo Kaise Lagaye
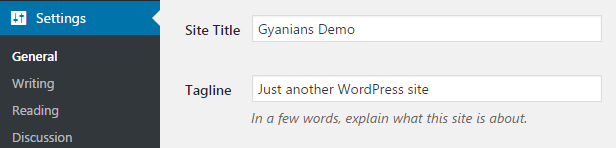
Blog Header में Logo almost सभी blogs पर होता है. कुछ bloggers Logo Simple Text में लगाते है और कुछ Image की form में. इस post में आपको मैं दोनों ही तरह से लोगो लगाना बताऊंगा. Text Logo में हम अपने blog का Site Title और Tagline use करते है. अगर आप भी Text Logo लगाना चाहते हो तो पहले WordPress Admin Dashboard में Settings >> General में जाकर अपने blog के लिए Site Title और Tagline Set कर लीजिये.
अब header.php file को notepad++ में open कर लीजिये. मैंने यहाँ 2 columns create किये है, पहले column में हम Text या Picture Logo लगायेंगे और second column को बाद में ads banner लगाने लिए blank छोड़ देंगे. Text Logo कैसे लगाते है इसका code snippet नीचे दिया है.
जिसमे मैंने bloginfo() function का use किया है जिसे बारे में आपको part 2 में बता दिया है. यहाँ मैंने bloginfo() function से site का home address, site का title और description को print कराया है.
<div class="row" id="logobar">
	<div class="col-lg-3 col-md-3 col-sm-3">
		<h1> <a href="<?php bloginfo('wpurl'); ?>"> <?php bloginfo('name'); ?> </a> </h1>
		<p> <?php bloginfo('description'); ?> </p>
	</div>
	<div class="col-lg-9 col-md-9 col-sm-9">
		<!-- 729x90 Size Ads banner area -->
	</div>
</div>
अब आप अपनी site को visit करके देखें. आपको आपकी site का title नजर आएगा जिसको मैंने site के home page के साथ link कर दिया है यानी जब भी कोई उस पर click करेगा वो आपकी site के home page पर आ जायेगा. Site title के नीचें site tagline नजर आएगी.
आप Site title और tagline को style.css file में CSS code करके कोई भी style दे सकते है. मुझे उम्मीद है की आप WordPress Theme Development with Bootstrap in Hindi series में WordPress Blog Header Me Text Logo Kaise Lagaye ये अच्छे से समझ गये होंगे.
WordPress Blog Header Me Image Logo Kaise Lagaye
Image Logo लगाने के लिए बहुत से तरीके है लेकिन यहाँ मैं आपको best तरीका बताने बाला हूँ, जिससे आप कभी भी बहुत आसानी से अपना Logo set और change कर सकते हो. इस तरीके में हम WordPress के in-built Custom Header theme feature का use करेंगे. इस feature को WordPress dashboard मे activate (add) करने के लिये आपको add_theme_support() को functions.php मे use करना होगा.
जैसा की मैंने आपको part 1 में बता दिया है की functions.php file से आप WordPress theme में custom functionality add करते हो. functions.php file में सभी code <?php ?> के बीच में आता है. अब आप functions.php file को open करिए और उसमे उसमे नीचे दिए गये code को copy paste कर दीजिये. अब आपको WordPress dashboard में Appearance के अंदर Header feature नजर आएगा.
//Activate Header feature
$defaults = array(
'default-image' => '',
'width' => 0,
'height' => 0,
'flex-height' => true,
'flex-width' => true,
'uploads' => true,
);
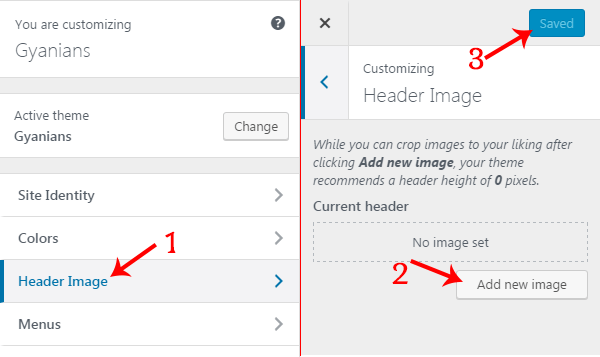
add_theme_support( 'custom-header', $defaults );Header option पर click करने से आपकी theme का customizing mode open हो जाएगा. अब आपको Header Image option पर click करना है और उसके बाद Add New Image पर click करके अपने computer से अपनी site का Logo select करना है और अंत में Saved button पर click करना है.
इसी तरह जब भी आप अपना Logo change करना चाहो कर सकते हो. अब हमने Logo select करना तो सीख लिया लेकिन अभी हमारा Logo theme में नजर नही आ रहा है उसके लिए आपको कुछ code करना होगा.
अब आप header.php file open करिए और जहाँ हमने पहले Text Logo लगाया था उस code को remove करने नीचे दिए code को copy-paste कर दीजिये. इस code में मैंने WordPress के php function से dynamic code करके Logo image का src, width, height attributes set किये हैं.
अब जैसे ही आप अपनी theme को reload करेंगे आपको अपना Image Logo नजर आने लगेगा. मुझे उम्मीद है की आप WordPress Theme Development with Bootstrap in Hindi series में WordPress Blog Header Me Image Logo Kaise Lagaye ये अच्छे से समझ गये होंगे.
<img src="<?php header_image(); ?>" height="<?php echo get_custom_header()->height; ?>" width="<?php echo get_custom_header()->width; ?>" class="img-responsive" alt="gyanians_logo" />- Read: WordPress User Roles and Permissions Kya Hoti Hai in Hindi
- Read: WordPress Trackbacks and Pingbacks Kya Hai in Hindi
- Read: Blog Posts Me Programming Code Snippets Ko Kaise Add Kare?
जैसा की मैंने आपको अपनी Bootstrap Post में बताया था की Bootstrap framework आपके theme development process को fast करता है क्योंकि Bootstrap में आपको अपनी site में लगाने के लिए ready to use responsive component मिल जाते है. हम भी WordPress Theme में Responsive Navbar लगाने के लिए Bootstrap Navbar component का use करेंगे.
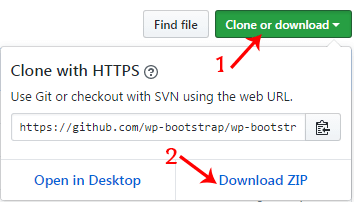
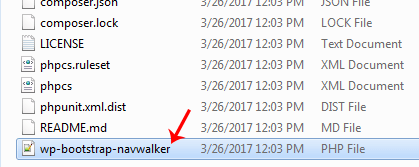
Bootstrap Navbar को WordPress menu management system के साथ integrated (जोड़ने) के लिए हम “Custom Navwalker Class” का use करेंगे, इसलिए इस दिए गये link पर click करके Custom Navwalker Class को download कर लीजिये.
जब आप इसे download करेंगे तो इसकी zip file में other बहुत सारी files होंगी लेकिन आपको सिर्फ wp-bootstrap-navwalker.php को copy करके अपने theme को root folder में paste करना हैं जहाँ सभी files (index, header etc) create की है.
WordPress Theme में Bootstrap Navbar add करने के लिए अब आपको functions.php file में Custom Navwalker Class को register करना होगा. नीचे code दिया है जिसे आप copy करके अपने functions.php में paste कर दीजिये. याद रखें functions.php में सभी code <?php ?> के बीच में आता है, यानी नीचे दिए गये code को आप add_theme_support() function के नीचें और php closing ?> से पहले paste कर दीजिये.
// Register Custom Navigation Walker
require_once('wp-bootstrap-navwalker.php');
अब हम WordPress Dashboard में menu management feature को activate (add) करेंगे, जहाँ से आप categories और pages को अपने navbar में add कर सकते हो. Menus feature को activate करने के लिए आपको functions.php में add_theme_support(‘menus’) function का use करना होता है.
WordPress theme में Menu create करने से पहले हमे menus को functions.php file registered करना होता है. Menus registered करने के लिए हम register_nav_menu(‘menu_name’,’description’) का use करते है. नीचें code snippets में मैंने menu को activate और 2 menus को registered किया है, इस code को आप functions.php में copy-paste कर दीजिये.
//Active Menu Feature
function gyanians_theme_menus()
{
	add_theme_support('menus');
	register_nav_menu('primary',"This Menu for Header");
	register_nav_menu('secondary',"This Menu for Footer");
}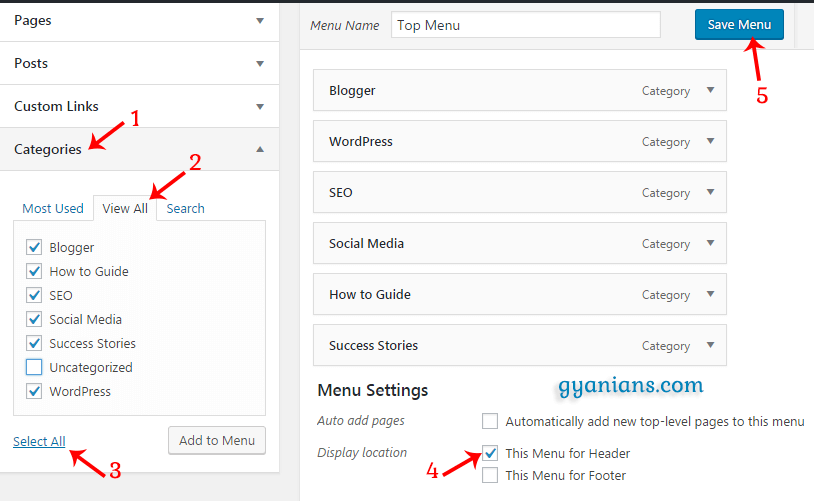
add_action('init','gyanians_theme_menus');ऊपर दिए code को करके हमने अपनी theme के Menu Bar के लिए एक तरह का foundation तैयार कर लिया है. अब हम WordPress Dashboard से Menu Bar create करेंगे. Menu Bar में हम लोग Categories and Pages को add करते है. इसलिए आप अपने blog niche अनुसार Categories and Pages create कर लें और नीचे बताये तरीके को follow करके उन्हें Menu Bar में add कर लें.
अब आप Appearance >> Menus में जाकर किसी भी name से एक Menu Create कर लीजिये. अब आप जो भी pages और categorise Header menu bar में show करना चाहते हो उन्हें add कर लीजिये. Add करने के बाद Display Location में This Menu for Header पर click करके Save Menu button पर click कर दीजिये.

अब हम header.php file में bootstrap का navbar create कर रहें है जिसमे wp_nav_menu() और wp_bootstrap_navwalker() functions की help से हमने WordPress dashboard में जो menu create किया है उसे show करेंगे.
नीचें दिए code को आप header.php में copy-paste कर दीजिये. अब हमने WordPress Theme Development with Bootstrap in Hindi series के इस part के process को पूरा कर लिया है आप सभी changes code को नीचें देख सकते है.
WordPress Theme Development in Hindi
<nav class="navbar navbar-inverse">
	<div class="container-fluid">
		<div class="row nav-row">
			<header>
				<div class="navbar-header">
                    <button type="button" class="navbar-toggle collapsed" data-toggle="collapse" data-target="#navbar-collapse-1" aria-expanded="false">
                        <span class="icon-bar"></span>
                        <span class="icon-bar"></span>
                        <span class="icon-bar"></span>
                    </button>
				</div>
			</header>
			<div class="collapse navbar-collapse" id="navbar-collapse-1">
			<?php
                wp_nav_menu( array(
                    'theme_location'    => 'primary',
                    'depth'             => 2,
                    'container'         => '',
                    'menu_class'        => 'nav navbar-nav',
                    'walker' 			=> new wp_bootstrap_navwalker())
                );
            ?>
			</div>
		</div>
	</div>
</nav>
Look all Changed in Header File: Theme Development in Hindi
<!DOCTYPE html>
<html <?php language_attributes(); ?>>
<head>
	<meta charset="<?php bloginfo('charset' ); ?>">
	<meta http-equiv="X-UA-Compatible" content="IE=edge">
	<meta name="viewport" content="width=device-width, initial-scale=1">
	<meta name="description" content="<?php bloginfo('description') ?>">
	<title>
		<?php
		if(is_home()) { bloginfo('name'); echo ' - ';  bloginfo('description'); }
		else { wp_title(''); echo ' - '; bloginfo('name'); }
		?>
	</title>
	<link rel="stylesheet" href="https://maxcdn.bootstrapcdn.com/bootstrap/3.3.7/css/bootstrap.min.css">
    <link href="https://maxcdn.bootstrapcdn.com/font-awesome/4.7.0/css/font-awesome.min.css" rel="stylesheet">
	<link rel="stylesheet" href="<?php bloginfo('stylesheet_url'); ?>">
	<?php wp_head(); ?>
</head>
<body>
<div class="container" id="holder">

<div class="row" id="logobar">
	<div class="col-lg-3 col-md-3 col-sm-3">
		<img src="<?php header_image(); ?>" height="<?php echo get_custom_header()->height; ?>" width="<?php echo get_custom_header()->width; ?>" class="img-responsive" alt="gyanians_logo" />
	</div>
	<div class="col-lg-9 col-md-9 col-sm-9">
		<!-- 729x90 Size Ads banner area -->
	</div>
</div>

<nav class="navbar navbar-inverse">
	<div class="container-fluid">
		<div class="row nav-row">
			<header>
				<div class="navbar-header">
                    <button type="button" class="navbar-toggle collapsed" data-toggle="collapse" data-target="#navbar-collapse-1" aria-expanded="false">
                        <span class="icon-bar"></span>
                        <span class="icon-bar"></span>
                        <span class="icon-bar"></span>
                    </button>
				</div>
			</header>
			<div class="collapse navbar-collapse" id="navbar-collapse-1">
			<?php
                wp_nav_menu( array(
                    'theme_location'    => 'primary',
                    'depth'             => 2,
                    'container'         => '',
                    'menu_class'        => 'nav navbar-nav',
                    'walker' 			=> new wp_bootstrap_navwalker())
                );
            ?>
			</div>
		</div>
	</div>
</nav>
Look all Changed in Functions File: Theme Development in Hindi
<?php

//Activate Header feature
$defaults = array(
	'default-image'         => '',
	'width'                 => 0,
	'height'                => 0,
	'flex-height'           => true,
	'flex-width'            => true,
	'uploads'               => true,
);
add_theme_support( 'custom-header', $defaults );

// Register Custom Navigation Walker
require_once('wp-bootstrap-navwalker.php');


//Active Menu Feature
function gyanians_theme_menus()
{
	add_theme_support('menus');
	register_nav_menu('primary',"This Menu for Header");
	register_nav_menu('secondary',"This Menu for Footer");
}
add_action('init','gyanians_theme_menus');

?>
WordPress Theme Development Tutorial in Hindi
Gyanians, इस post में हमने Text और Image Logo को लगाना सिखा, Bootstrap Responsive Navbar को अपनी theme में कैसे लगायें ये सिखा और इसके अलावा functions.php file से अपने WordPress dashboard के कुछ features को activate और use किया.
इस series के next part WordPress Theme Development with Bootstrap in Hindi (Part 4) में हम footer.php file में हम Dynamic copyright text with date और important pages (Home, About Us, Privacy Policy etc) को footer में add करना सीखेंगे और इसके अलावा अभी तक किये code को style.css file में CSS code से style (design) देंगे.
- Read: WordPress Par New Users Add Ya Delete Kaise Kare?
- Read: WordPress Homepage Se Specific Posts Kaise Hide Kare?
- Read: Font Awesome Icons WordPress Blogspot Blog Me Kaise Add Kare?
आशा करते है की आपको ये WordPress Theme Development Tutorial in Hindi का WordPress Theme Development in Hindi post पसंद आई होगी. अगर आपको इस post से related कोई सवाल या सुझाव है तो नीचे comment करें और इस post को अपने दोस्तों के साथ जरुर share करें.
- Google Meet से क्या होता है – पूरी जानकारी | Google Meet App
- Vokal App क्या है – Vokal App के बारे में पूरी जानकारी | Vokal App Download
- Khatabook App क्या है – पूरी जानकारी | Khatabook App Download
- Reddit App क्या है – Reddit App के बारे में पूरी जानकारी | Reddit App Download
- Yoyo App क्या है – Yoyo App कैसे चलाते है | Yoyo App Download


GREAT
thank you ~
Good Word Keep It…
Where’s the 4th part of WordPress Theme Development with Bootstrap in Hindi ….????
i will post very soon and thanks for your reminder ~
thanks brother .. keep visiting ~
Please update As soon as possible ..because these are thing for startup a THEME ..not for compelete a website ..Thanks
ok brother .. i will post soon ~
Where’s the 4th part of WordPress Theme Development with Bootstrap in Hindi ….????
4th part i will post on Monday so keep visiting ~
sir upload the 4th pat as soon as possible
OK Brother main jaldi hi karunga…